Code Summary: Tiled YOLO Object Detection on Large Images
Here’s the deal, I’ve been taking photos for nearly 10 years. Amounting for just over 30k photos from various sources (Iphone, Sony, Nikon, Etc). Wouldn’t it be interesting to tag these photos to create a searchable repo for what’s being captured? Maybe, here we go.
This script performs object detection on a high-resolution image by splitting it into tiles, running YOLO inference on each tile, and merging the results back into a single set of detections.
Overview
- Uses Ultralytics YOLO models (
yolo11nandyolo11x) for object detection. (Your mileage my vary, but when the largest yolo model is only 100 mbs, why not use it. We arent pushing to prod.) - Handles large images by tiling them into fixed-size patches. (This is important due to YOLO resizing the images to 640x640, That majority of my photos were taken with full frame camera, thus much larger.)
- Reassembles detections into original image coordinates.
- Removes duplicate detections using Non-Maximum Suppression (NMS).
- Visualizes the final detections on the original image.
Key Steps
1. Model Initialization
- Loads two YOLO models:
yolo11n.pt(lightweight)yolo11x.pt(high-accuracy, used for inference)
- Uses the Ultralytics YOLO API for prediction.
2. Image Preparation
- Loads a JPEG image from disk. (There are other file formats, preprocessing for that is beyond the scope of what im trying to show here. Maybe for the next post.)
- Converts it to RGB and rotates it 90 degrees for correct orientation. (When opened, PIL auto assigns an orientation, this impacts the quality of the object detection. IE., boats are typically sitting on the water.)
3. Image Tiling
- Splits the large image into fixed-size tiles (default: 640×640 pixels).
- Supports configurable overlap between tiles (set to
0here). (When tiling, you are left with alot of edge images, slicing objects and adding little value. When you photograph something, it tends to be in the middle, duh.) - Stores each tile along with its
(x, y)offset in the original image.
4. Tile-Based Inference
- Runs YOLO predictions independently on each tile.
- Extracts bounding boxes, confidence scores, and class IDs.
- Translates tile-relative bounding box coordinates back to original image coordinates.
5. Cross-Tile Non-Maximum Suppression
- Combines all detections from every tile.
- Applies class-aware NMS using
torchvision.ops.nmsto remove duplicate detections caused by tiling. - Uses an IoU threshold of
0.5.
6. Confidence Filtering
- Filters final detections by confidence score (keeps detections with
confidence > 0.50). (Adjustable, probably should be 80%.)
7. Visualization
- Draws bounding boxes and class labels on the original image using OpenCV.
- Displays the annotated image using PIL.
Output
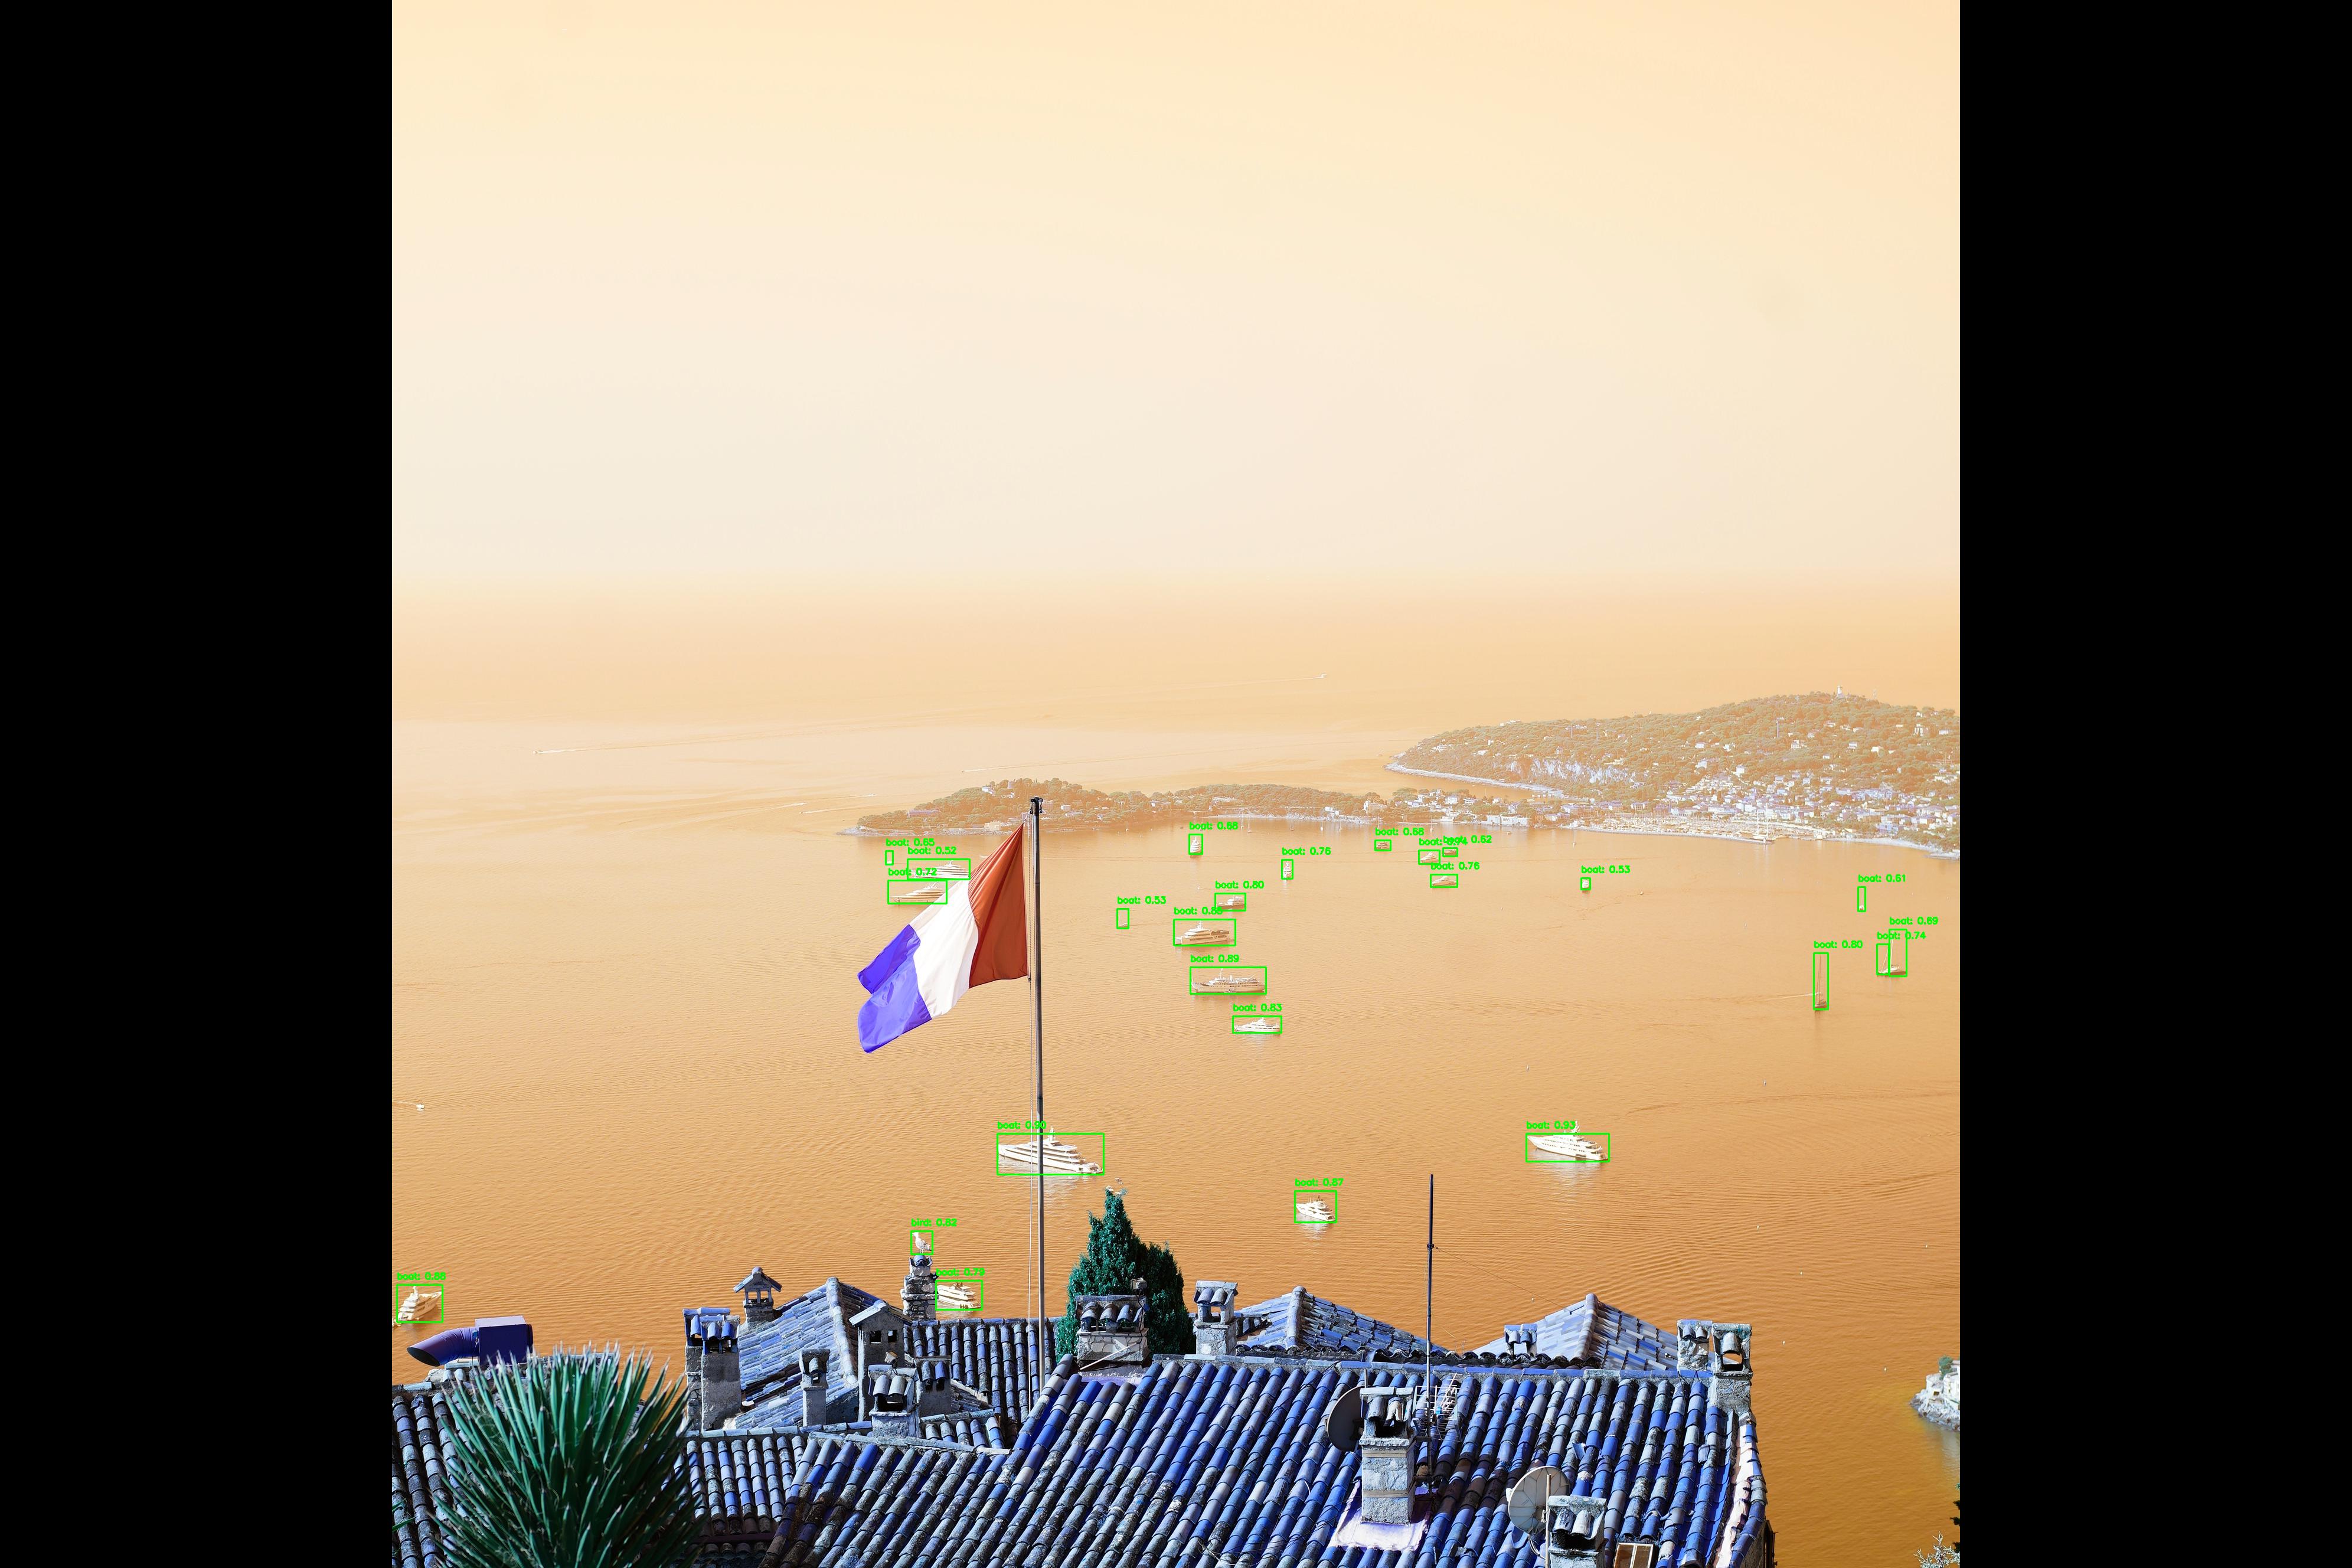
- A single annotated image showing detected objects across the full original image.
- Detections are:
- Merged across tiles
- De-duplicated
- Filtered by confidence
Use Case
This approach is well-suited for:
- High-resolution photography
- Allows collection of image objects
- Any image too large for direct YOLO inference at native resolution
It preserves detection accuracy while avoiding GPU memory constraints.
Lets do some imports.
from ultralytics import YOLO
from PIL import Image
import numpy as np
import torch
import cv2


model_n = YOLO("yolo11n.pt") # Small
model_x = YOLO("yolo11x.pt") # XL
path = 'E:\\8_Life\\2025_08_14_France\\DSC00304.JPG'
Functions applied.
def tile_image(image: Image.Image, tile_size: int, overlap: int):
    """Splits an image into overlapping tiles."""
    img_width, img_height = image.size
    tiles = []

    # Iterate over the image with a stride (tile_size - overlap)
    stride = tile_size - overlap
    for y in range(0, img_height, stride):
        for x in range(0, img_width, stride):
            # Ensure the tile doesn't go out of bounds
            # Adjust coordinates for the last tiles to fit within the image
            left = x
            top = y
            right = min(x + tile_size, img_width)
            bottom = min(y + tile_size, img_height)

            # If the adjusted tile is smaller than the required size,
            # you might want to adjust its start coordinates to maintain the size
            # For simplicity here we just use the bounds
            if right - left < tile_size:
                left = img_width - tile_size
            if bottom - top < tile_size:
                top = img_height - tile_size

            # Crop the tile
            tile = image.crop((left, top, right, bottom))
            tiles.append({'tile': tile, 'coords': (left, top)})

            # Stop if reached the end of the row
            if x + tile_size >= img_width:
                break
        # Stop if reached the end of the column
        if y + tile_size >= img_height:
            break

    return tiles


def predict_on_tiles(model, tiles):
    """Runs predictions on image tiles and records original coordinates."""
    all_detections = []
    for tile_info in tiles:
        tile_img = tile_info['tile']
        left, top = tile_info['coords']

        # Run inference
        # Ultralytics predict function returns a list of Results objects
        results_list = model.predict(source=tile_img, verbose=False)

        for results in results_list:
            boxes = results.boxes.xyxy.cpu().numpy()
            confs = results.boxes.conf.cpu().numpy()
            clss = results.boxes.cls.cpu().numpy()

            # Rescale bounding box coordinates to the original image
            for box, conf, cls in zip(boxes, confs, clss):
                x1, y1, x2, y2 = box
                original_x1 = x1 + left
                original_y1 = y1 + top
                original_x2 = x2 + left
                original_y2 = y2 + top
                all_detections.append([original_x1, original_y1, original_x2, original_y2, conf, cls])

    return np.array(all_detections)


# 3. Remove Duplicates using Non-Maximum Suppression (NMS)
def apply_nms(detections, iou_threshold=0.5):
    """Applies Non-Maximum Suppression to filter duplicate detections."""
    if len(detections) == 0:
        return []

    # Convert to a format suitable for NMS (xyxy, confidence, class)
    boxes = detections[:, :4]
    scores = detections[:, 4]
    classes = detections[:, 5]

    # Convert numpy arrays to torch tensors
    boxes_tensor = torch.from_numpy(boxes)
    scores_tensor = torch.from_numpy(scores)
    classes_tensor = torch.from_numpy(classes)

    # We need class-aware NMS or apply NMS per class
    unique_classes = torch.unique(classes_tensor)
    keep_indices = []

    for cls in unique_classes:
        cls_indices = (classes_tensor == cls).nonzero(as_tuple=False).flatten()
        cls_boxes = boxes_tensor[cls_indices]
        cls_scores = scores_tensor[cls_indices]

        # Apply NMS
        keep = torch.ops.torchvision.nms(cls_boxes, cls_scores, iou_threshold)
        keep_indices.append(cls_indices[keep])

    keep_indices = torch.cat(keep_indices, dim=0)

    # Return filtered detections
    return detections[keep_indices.cpu().numpy()]


large_image = Image.open(path).convert("RGB").rotate(90)
TILE_SIZE = 640  # Standard YOLO input size
OVERLAP = 0 # No overlap
Fancy print statements.
print("Tiling image...")
tiles = tile_image(large_image, TILE_SIZE, OVERLAP)
print(f"Generated {len(tiles)} tiles.")
print("Running predictions on tiles...")
all_detections = predict_on_tiles(model=model_x, tiles=tiles)
print(f"Found {len(all_detections)} total detections before NMS.")
print("Applying Non-Maximum Suppression...")
final_detections = apply_nms(all_detections, iou_threshold=0.50)
print(f"Found {len(final_detections)} unique detections after NMS.")
Tiling image...
Generated 35 tiles.
Running predictions on tiles...
Found 34 total detections before NMS.
Applying Non-Maximum Suppression...
Found 29 unique detections after NMS.
# Filter Detections:
filtered_arr = final_detections[final_detections[:, 4] > 0.50]

img_cv2 = cv2.cvtColor(np.array(large_image), cv2.COLOR_RGB2BGR)
for det in filtered_arr:
    x1, y1, x2, y2 = map(int, det[:4])
    conf, cls = det[4], det[5]
    label = f"{model_x.names[cls]}: {conf:.2f}"
    cv2.rectangle(img_cv2, (x1, y1), (x2, y2), (0, 255, 0), 2)
    cv2.putText(img_cv2, label, (x1, y1 - 10), cv2.FONT_HERSHEY_SIMPLEX, 0.5, (0, 255, 0), 2)

Image.fromarray(img_cv2, 'RGB').show()
Lets take a look!
TODO
Remove extra codeSplit up code blocksPersonalize description- Spell check
- Looks like YOLO doesn’t detect flags.
Last Updated: 2026-01-27